


Each year, around 2 million people travel from all over the world to visit Mount Rainier National Park. With its magical old-growth forests, spectacular waterfalls, pristine mountain lakes and wildflower meadows, it’s no wonder this mountain is a popular destination.

Those of us lucky enough to live in Lewis County don’t have to travel very far to enjoy the beauty of this iconic landmark. In fact, part of Mount Rainier National Park sits right within the borders of Lewis County! From Narada Falls and Reflection Lakes to Box Canyon and Silver Falls, our county is home to some of the mountain’s most spectacular spots.
So, if it’s been a while since you’ve visited Rainier or you’re looking for an epic vacation destination close to home, how about a day trip to the mountain in our own backyard?
In this 2025 Mount Rainier travel guide, we’ve created a day-trip itinerary that begins in Lewis County in the gateway towns of Morton or Packwood. The trip includes stops at some of the park’s must-see sites, from lakes, rivers and waterfalls to scenic overlooks and wildflower meadows. We will also include popular hikes, travel tips, updated information about park entry fees and reservations, where to find restrooms and picnic spots and ways to beat the crowds.

Exploring Paradise
Longmire, Paradise, Reflection Lakes and Silver Falls
This suggested itinerary begins in the small logging town of Morton. From Highway 12, follow the sign for Morton and Mount Rainier and turn north on Highway 7. If you need gas, Morton is a great place to fill up before venturing into the park. You can also grab snacks at Morton Country Market or coffee for the road at Main Avenue Coffeehouse and Bakery.
Continue north on Highway 7 to Elbe. Follow the sign for Mount Rainier National Park, and after crossing the Nisqually River, turn east onto Highway 706 toward Ashford. Follow this road into the park.
Before arriving at the entrance station, be sure to have your park pass and ID ready. No pass? No problem. You can purchase one at the entrance station using a credit or debit card (cash is no longer accepted), online or at these locations.
NOTE: You can also do this trip in reverse, beginning in Packwood. From Packwood, take Highway 123 to Stevens Canyon Road, and travel west through the park following this itinerary backwards. You’ll exit the park through the Nisqually Entrance and return to Highway 12 in Morton.

1. MOUNT RAINIER NATIONAL PARK – NISQUALLY ENTRANCE
Once you drive under the iconic Gateway Arch, you’ll be in Mount Rainier National Park. First built in 1922, this rustic log arch serves as the official gateway to the park’s Nisqually Entrance.
TIP: Because this is one of the most popular places to enter the park, you can expect a long wait at the gate during the busy summer months and on weekends. Arrive early or later in the day, or visit on a weekday to avoid lines.
NOTE: Timed Entry Reservations are not required for the Nisqually Entrance during 2025. But they are still necessary for the Sunrise Corridor. Visit Mount Rainier National Park Timed Entry Reservations for more information.
There are vault restrooms and picnic tables available at the Kautz Creek trailhead, just a few miles up the road.

2. LONGMIRE AREA
Open year-round, Longmire is the perfect place to begin your Mount Rainier adventure. This historic area features the National Park Inn, a gift shop, a Wilderness Information Center and the Longmire Museum. You’ll also find a number of hikes for every age and ability.
Stroll the 0.7-mile loop around Longmire Meadow on the Trail of the Shadows, located across the park road from the National Park Inn. This family-friendly, self-guided hike through a shady old-growth forest is not only great for hot days, but it’s also absolutely magical in the snow.
The Rampart Ridge trail, which begins from the Trail of the Shadows, offers hikers a bit more of a challenge. Rated moderate, this steep 4.6-mile loop gains over 1300 feet in elevation, traveling through the forest with stunning views from the ridge top.
From Longmire, you can also access the Wonderland Trail and the challenging Eagle PeakTrail. Grab a map of the Longmire Area Trails and learn about their current status at the Wilderness Information Center.
There are restrooms with flush toilets available near the Wilderness Information Center and picnic tables near the gift shop.

3. CARTER FALLS & MADCAP FALLS TRAIL
Just over two miles round-trip, this moderate trail crosses the Nisqually River on a rustic log bridge. It follows the Paradise River through the forest to two beautiful waterfalls, Carter Falls and Madcap Falls. Park at the paved pullout just below the Cougar Rock Campground.
There are restrooms and a picnic area just up the road from the trailhead at Cougar Rock Campground.
4. COMET FALLS
This steep 3.6-mile round-trip hike boasts multiple waterfalls, beautiful forests, wildflowers, rocky slopes that are home to pikas and marmots and an awe-inspiring view of the 300-foot Comet Falls at the end. For those wishing to extend the hike, there is an option to continue past Comet Falls up to Van Trump Park for a total of 5.6 miles round-trip and 2,200 feet of elevation gain.
Park at the paved pullout on the left side of the road past Cougar Rock. This is one of the park’s most popular hikes, so parking is extremely limited. Arrive early in the day to secure a spot. There are no restrooms at the trailhead.
TIP: If you are short on time, consider hiking up to the first bridge, which offers a stunning view of Christine Falls.
5. CHRISTINE FALLS
For the perfect waterfall picture, you can’t beat Christine Falls! The viewpoint is located just a short walk down from the paved pullout along the road. There, you can snap a photo of this beautiful waterfall, perfectly framed beneath the rustic stone arch of the bridge above.
6. RICKSECKER POINT OVERLOOK
Take this short side road to the overlook for a stunning view of Mount Rainier.
NOTE: Ricksecker Point Overlook is closed in 2025 for construction.
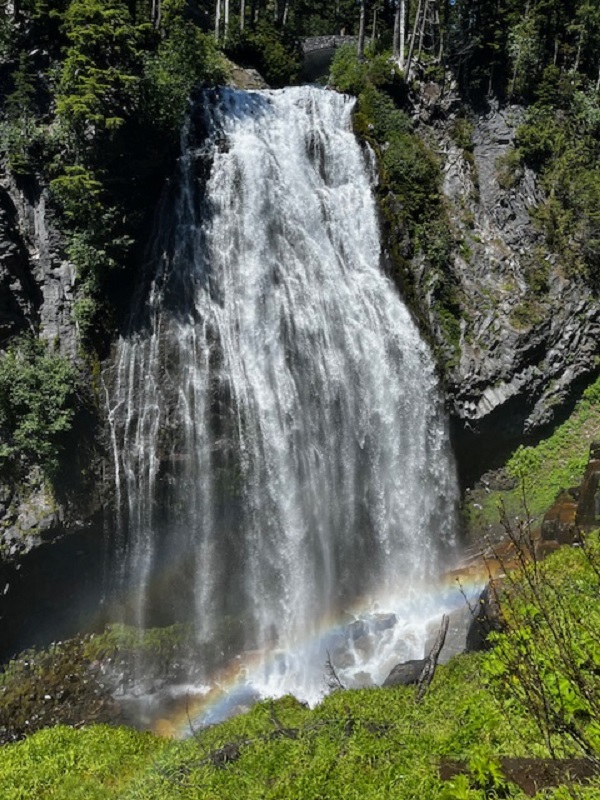
7. NARADA FALLS
Enjoy multiple views of Narada Falls from this large overlook. Glimpse this beautiful waterfall from the parking area above or get an even better view from the short but steep trail to the viewpoint down below.
There is a comfort station with wooden benches and restrooms with flush toilets at the north end of the parking area across the stone bridge.
8. PARADISE AREA
Once you pass Narada Falls, continue driving up the mountain and follow the sign to Paradise. Surrounded by the jagged peaks of the Tatoosh Range on one side and the glistening slopes of Mount Rainier on the other, this spectacular subalpine meadow deserves its name.
Plan to spend a couple of hours exploring this slice of heaven. Check out the Henry M. Jackson Visitor Center, where you’ll find exhibits, a concession, a gift shop and epic views of the mountain from the second-floor windows. If Paradise Inn is open, take a peek inside this quaint rustic lodge, built in 1916 and designated as a National Historic Landmark.
Numerous trails at Paradise showcase the wildflower meadows and offer breathtaking views of the mountain. Some of our favorites include the Skyline Trail, Alta Vista Trail and Nisqually Vista Trail. If you’re short on time, we recommend you hike the first half mile of the Skyline Trail to Myrtle Falls, one of the park’s most photographed waterfalls.
TIP: During the peak summer season, parking at Paradise can be hell. To secure a spot, arrive early in the day or later in the afternoon. Or consider visiting the park on a weekday. If the upper parking lot is full, you can sometimes find additional parking in the lower parking area or picnic area, although these spots will require a long walk to reach Paradise. If you absolutely cannot find parking, we recommend continuing on to Reflection Lakes and trying again later.
NOTE: To protect the fragile meadows at Paradise, please stay on the trail, do not pick the flowers and do not feed the wildlife.
There are restrooms with flush toilets in the visitor center and a designated picnic area just down the road from Paradise.

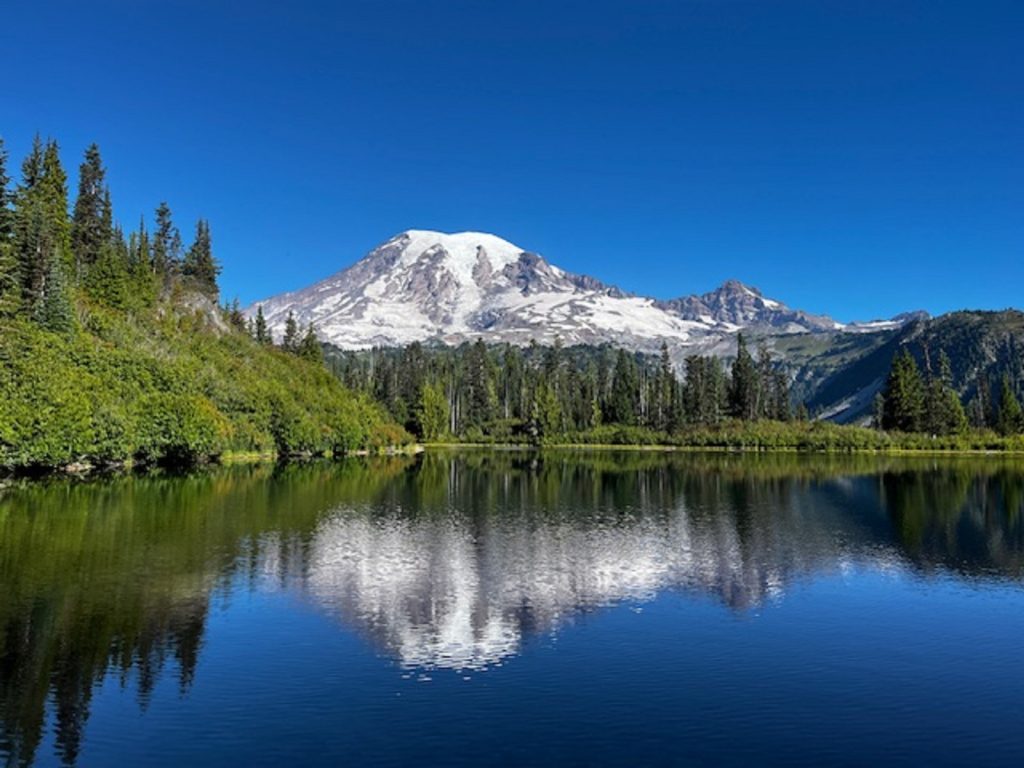
9. REFLECTION LAKES
When you finish exploring Paradise, head back down the mountain. You can return the way you came or take the one-way road heading east, which will loop back to the main park road. Follow the signs to Stevens Canyon Road and Reflection Lakes.
Reflection Lakes is one of the park’s most stunning sights. On a clear day when the mountain is out, the mirror-like surface of the water reflects the snowcapped peak, creating a perfect picture view. The lakeshore path offers several fantastic photo opportunities.
Reflection Lakes also offers a few excellent hiking options. The High Lakes Loop, which begins at the parking area, makes a circle above the lakes. This moderate 3-mile hike includes summer wildflowers and impressive views of the Tatoosh Range and Lake Louise from the rocky bluff called Faraway Rock. This trail is absolutely spectacular in the fall.
Hikers can also access the Wonderland Trail and the Pinnacle Peak Trail from Reflection Lakes.
TIP: Head down to the smaller lake at the end of the parking area for the best reflection. There are no restrooms here.
TURNAROUND OPTION
Reflection Lakes is a great place to turn around if you want to return home the way you came, through Morton. You can also catch any stops you missed on the way up.
Otherwise, keep going on Stevens Canyon Road to visit a few more scenic stops and hikes. This route exits the park at Ohanapecosh and brings you back to Highway 12 at Packwood.
10. BENCH AND SNOW LAKES TRAIL
Just down the road past Reflection Lakes is the trail to two more alpine lakes, Bench Lake and Snow Lake. If you thought Reflection Lakes was something, just wait until you see Bench Lake! This spectacular alpine lake, located off a spur trail just 0.75 miles from the trailhead, rests on a flat shelf of land and offers a picture-perfect reflection of Mount Rainier, without the crowds. The moderate trail continues another half mile to Snow Lake for a total distance of 2.5 miles round-trip and an elevation gain of 610 feet.
11. BOX CANYON
Stop at this dramatic overlook for a view of the narrow slot canyon carved by the Muddy Fork of the Cowlitz River. From the rustic arch bridge that spans it, you can look down 180 feet to the river below. The Box Canyon Area also includes a short, half-mile paved loop trail that crosses the canyon over a wooden footbridge.
There is a comfort station with restrooms and a separate picnic area west of the tunnel. NOTE: No potable water or flush toilets are available at Box Canyon in 2025.

12. SILVER FALLS TRAIL
Our last stop on this Mount Rainier day trip features one of the park’s most dramatic waterfalls—Silver Falls. The highlight of this easy out-and-back trail is the view of the Ohanapecosh River as it plunges over a series of ledges into a swirling, frothing pool below.
As you near the end of Stevens Canyon Road, follow the signs for Eastside Trail and Grove of the Patriarchs. Pull into the paved parking area on your left. Cross the road, heading south on the Eastside Trail for about half a mile until you reach the Silver Falls overlook.
Silver Falls can also be accessed from the Ohanapecosh Campground via the 3-mile Silver Falls Loop Trail.
NOTE: The Ohanapecosh Campground is closed in 2025 due to construction. Hikers can still access the falls via the Eastside Trail, but the 3-mile loop trail cannot be completed as a loop during construction.
CAUTION: Keep children close by and stay away from the river’s edge. The area around the falls is slippery and extremely dangerous.
There are restrooms at the Eastside Trail trailhead.
HEADING HOME
Exit the park through the Stevens Canyon Road Entrance and turn right on State Route 123 to head to Packwood and Highway 12.
If you’re getting hungry, Packwood offers several options for dining, including the Packwood Brewing Co., Cruiser’s Pizza, Cliff Droppers and food trucks at Longmire Springs Brewing.
Morton also offers a number of great eateries like Mill Town Smokehouse, Chimi’s Mexican Restaurant, and Mountain View Woodfired Pizza.
After your adventure, be sure to share your epic mountain pics with friends—and with us! Just pop them in the comment section for this article on our Facebook page.
Park Travel Tips
If this is your first time visiting the park or it’s been a while since you’ve come, we’ve put together a few tips to help you get the most out of your trip.
When is the best time of year to visit Mount Rainier?
Planning when to visit depends on what you like to see and do. Want to see the wildflowers or hike to alpine lakes? Definitely plan your visit for midsummer when the trails are free from snow, and wildflowers carpet the meadows. This is also the busiest time of year, so getting to the park early or visiting on a weekday will increase your chances of snagging a parking spot and avoiding the crowds.
For beautiful fall colors, cooler temps and less chance of crowds, plan your visit for the fall.
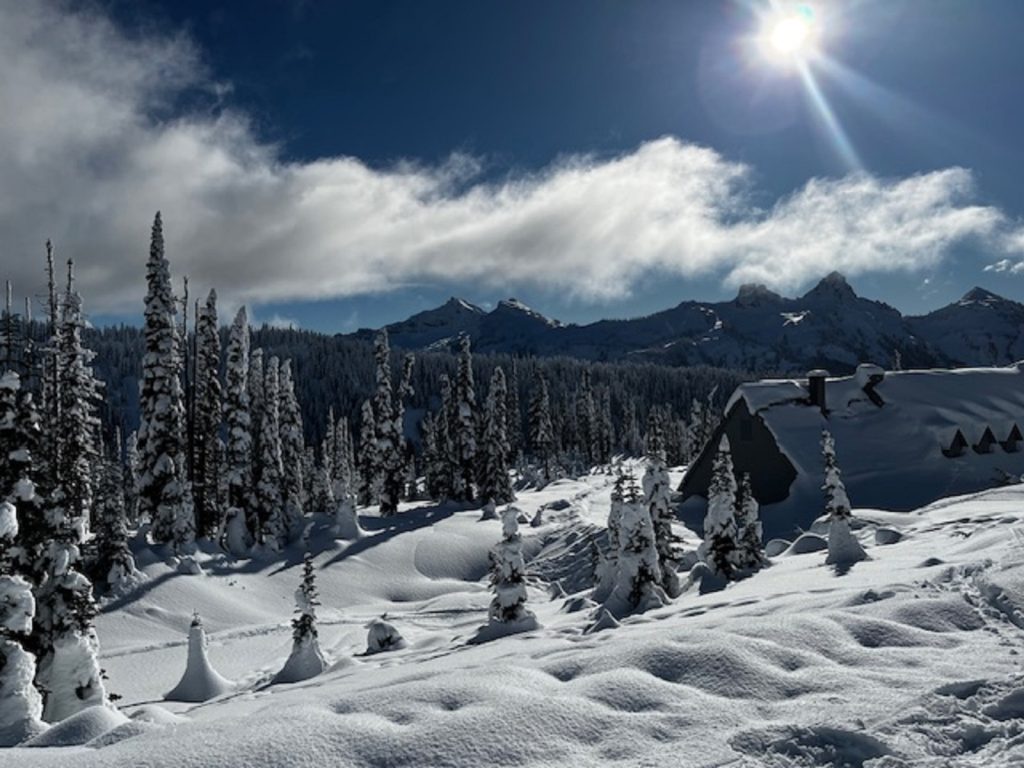
During the winter, Rainier turns into a magical wonderland. Walk through the snow on the Trail of the Shadows. Bring or rent snowshoes and trek through snowy fields at Paradise. NOTE: Longmire is open year-round, but the road to Paradise is only open on weekends during the winter and can be closed at any time due to weather.
Visiting the mountain in the spring also means fewer crowds, but the trails can be muddy in the lower elevations and still snow-covered in the higher elevations. So, while it may not be ideal for hiking, spring is still an excellent time for taking a scenic drive, especially on a clear day when the mountain is out.
No matter what time of year you plan to come, it’s always a good idea to check the park’s current road status, construction updates, trail conditions and weather. You can also view conditions at Longmire and Paradise on the live Mount Rainier webcams.
NOTE: During 2025, expect road delays up to 30 minutes during the week due to pavement preservation projects.
How to snag a parking spot at Paradise during the busy season
If visiting Paradise is at the top of your list, we suggest arriving at the park before 8 a.m. The earlier, the better! Skip the other stops and overlooks, and head straight to Paradise for a better chance at finding a parking spot. Then, visit the other areas of the park later.
If waking up early isn’t your thing (or if the mountain is still hiding behind morning clouds), you can visit the other areas of the park first, then time your visit to Paradise in the late afternoon, after 4 p.m., when most of the crowds have gone and the morning fog has burned off.
What should I pack for a day trip to Mount Rainier?
- Park Entry Pass & ID
- Plenty of water
- Snacks
- Lunch
- Sunscreen
- Sunglasses/shades
- Hat
- Coat or rain jacket, depending on the weather
- A full tank of gas
- This itinerary
If you plan to hike, in addition to the above, you’ll also want to bring hiking shoes, hiking poles (for moderate/challenging trails), crampons (for trails still covered in snow) and the 10 hiking essentials. Visit the Mount Rainier Hiking Safety Page for more information.
TIP: If you’d like a more immersive experience, you can download a self-guided audio driving tour, like the Mount Rainier National Park Tour from Shaka Guide or the Mount Rainier National Park Audio Tour from Guide Along. These tour apps provide turn-by-turn navigation, travel tips, hiking info and engaging stories about the park as you drive.
Can I bring my dog to the park?
Yes, but only in limited areas. Leashed pets are allowed in parking lots, campgrounds and paved roads only.
Pets are prohibited on ALL trails and wilderness areas in Mount Rainier National Park. So, if you plan to do a lot of hiking, it’s best to leave your dog at home. Keeping pets off the trails is for the safety of your pet as well as the park wildlife. Pets can become a tasty meal for bears, mountain lions or birds of prey. Pets have also injured and killed wildlife in the park.
If you do plan to bring your dog to the park, please pick up after your pet and dispose of all fecal matter. Also, remember not to keep them in the car.

Where can I purchase a pass to enter Mount Rainier National Park?
You can purchase an entry pass at the Nisqually Entrance Station. Credit/Debit or other electronic payment forms (such as Apple Pay) are accepted. Cash is not.
Choose from these kinds of entry passes:
- Mount Rainier National Park Standard Pass – $30/vehicle, valid for seven consecutive days at Mount Rainier National Park only for the driver and passengers in a single, private vehicle. This is a good choice if Mount Rainier is the only national park site you plan to visit, and you only plan to visit during one week of the year.
- Mount Rainier National Park Annual Pass – $55/vehicle, unlimited entry to Mount Rainier National Park for one year for the owner and passengers in a single, private vehicle. This is a better choice if Mount Rainier is the only national park you plan to visit this year, and you intend to return at least one more time during the year.
- America the Beautiful Pass – $80/vehicle, unlimited entry to more than 2,000 recreation sites managed by federal agencies, including National Parks and Federal Recreation Lands for the owner and passengers in a single, private vehicle. This is the best choice if you plan to visit more than one national park anywhere in the United States during the year.
- Senior Annual Pass – $20 for US citizens/permanent residents 62+ years old, providing unlimited entry for one year to National Parks and Federal Recreation Lands.
- Senior Lifetime Pass – $80/US citizens/permanent residents 62+ years old, unlimited entry for lifetime to National Parks and Federal Recreation Lands.
- Access Pass – FREE for US citizens and permanent residents with permanent disability
- Military Annual Pass – FREE for current US military and dependents for one year
- Military Lifetime Pass – FREE for Gold Star Family members and veterans
- Fourth Grade Pass – FREE for US students during their fourth-grade school year (September through August). This pass requires the student to complete a short online activity and to show the printed certificate in order to receive their pass. Visit Every Kid Outdoors to learn more.
NOTE: You can also purchase an America the Beautiful pass online at REI or online at the USGS Store. There is a service fee to purchase your pass from the online USGS Store, and at times, there can be a long wait to receive your pass in the mail. If you plan to visit the park soon, you may want to choose another option.
Can I buy a park pass with cash?
If you prefer to pay in cash, these locations in Ashford and Packwood sell $30 single-vehicle entrance passes, valid for 7 days:
- Ashford Creek Pottery – 30510 WA-706, Ashford, WA
- Ashford Valley Grocery – 29716 WA 706, Ashford, WA
- Ashford General Store – 30402 WA-706, Ashford, WA
- Whittaker Mountaineering – 30027 WA-706, Ashford, WA
- Blanton’s Market – 13040 US-12, Packwood, WA
When are the Fee Free Days for Mount Rainier National Park?
On certain days of the year, you can enter the park for free. The Fee Free Days for Summer/Fall 2025 are:
- Monday, August 4 – Great American Outdoors Act Signing Day
- Saturday, September 27, National Public Lands Day
- Tuesday, November 11 – Veterans Day
For more information about fees and passes, visit the Mount Rainier National Park Plan Your Visit page.
Is there cell service in the park?
Cell service throughout the park is minimal. Most of the drive, there won’t be any service, but you may get a signal at Paradise.

Final Thoughts
There is so much to see and do in the Paradise Area of Mount Rainier that it would be impossible to cram it all into one day. That’s the beauty of living so close to the park. There’s no need to rush to see it all.
In fact, to truly appreciate the beauty of the park, we recommend choosing just one or two hikes or sights for the day. Then, wrap up your trip in Morton or Packwood, enjoying good food at one of the local eateries, sharing your epic pictures with friends and planning your next adventure to the mountain in our backyard.


